

Cs Go Offline Server 128 Tick
Apr 28, 2022
Edgaras Chiliad.
3min Read
How to Make a Counter Strike Global Offensive Server on Linux – Step-by-Step
Have you been playing Counter-Strike: Global Offensive and decided it is fourth dimension to set up your own server? In this article, y'all will learn how to make a CS:Become server on Linux VPS.
Download Complete Linux Commands Cheat Canvas
Why Should I Have My Own CS:Become Server?
Well-nigh modernistic games nowadays rely on a constant internet connectedness to exist fully functional or at least, to offering unique gameplay and better updates.
Counter-Strike: Global Offensive is no exception. While offline gameplay is possible, the online version delivers more competitive and exciting action.
Notwithstanding, you lot can't do much when a public server is having network issues. Not to mention the persistent cheaters and trash talk that could harm your gaming feel.
That's why you should consider creating your own virtual private server. It allows you to have better control over your connection and y'all can personally choose the best hosting service. If yous are looking for a reliable server, cheque out our VPS hosting plan that offers great uptime for an affordable price, and provides great client support.
Second of all, it enables you to play the game past your ain rules. You're free at setting up the most enjoyable gaming feel for both you and your friends.
Furthermore, as the server admin, yous have the ability to kick or ban anyone that you find to be offensive or cheating.
Even so, before we show you how to make a CS:Go server, proceed in mind that we'll be using Linux VPS in this tutorial. Therefore, you need to log in to your server through SSH using your root details. At Hostinger, the login info is bachelor in the Server tab of your hPanel.
We recommend using default Linux or macOS terminals or Putty for Windows. If this is your starting time time using a terminal, you can read our article to acquire how to connect to a server via SSH.
How to Brand a CS:Get Server
Nosotros'll divide this guide into iv steps — installing pre-depends, downloading and installing SteamCMD, using CMD to download server files, and starting your CS:GO server.
1. Installing Pre-Depends
First, we have to install lib32gcc1 runtime library to brand sure that every following procedure is working properly. To become the package, go on with the following control:
apt-get install lib32gcc1
2. Downloading and Installing SteamCMD
Downloading and using SteamCMD as root users is a bad idea, as the program might mess with your system if in that location's e'er an issue. In order to prevent this, we must create a user for our software first.
- To do this y'all have to apply the useradd control:
useradd -grand steam
- Once the account is created, you take to log in as this user to start the installation of the SteamCMD. Apply the following command to login:
su - steam
In order to make a directory structured, it is recommended to create and enter the Steam directory with:
mkdir ~/Steam && cd ~/Steam
- Now we accept to download the latest version of SteamCMD from Valve server using:
wget https://steamcdn-a.akamaihd.net/client/installer/steamcmd_linux.tar.gz
Afterward that, run a tar control to unzip the file:
tar xf steamcmd_linux.tar.gz
Lastly, enter this line to run the programme:
./steamcmd.sh
3. Using SteamCMD to Download Server Files
If the installation was successful, yous should meet Steam prompt:
Steam>
Now you need to login to your Steam account. For security reasons, information technology is recommended to login with the following control:
login <username> <password>
Using the command below, choose a folder proper name for your installation binder:
force_install_dir ./cs_go/
At present it's fourth dimension to finally install and validate Counter-Strike: Global Offensive server files:
app_update 740 validate
In this case, 740 is the ID for Counter-Strike: Global Offensive dedicated server.
This whole process volition take a couple of minutes.
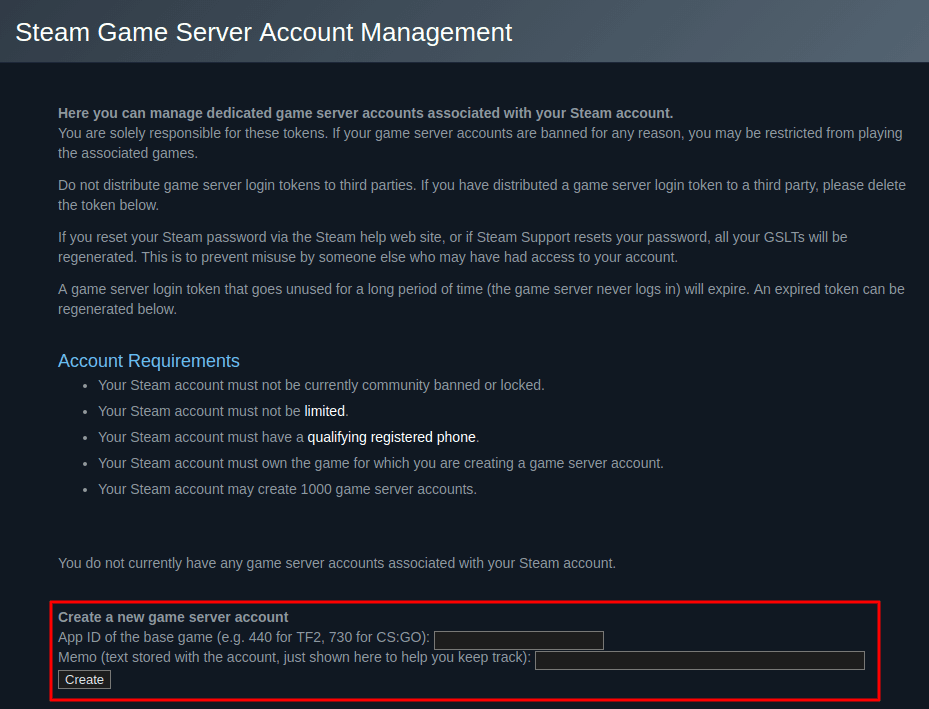
Open up the Steam server management folio to create a game server account.
- App ID of the base of operations game – blazon 730 for CS:Get here. Note that 740 is used specifically for a dedicated server.
- Memo – you can go out a reminder for yourself for your eyes only.
4. Starting Your CS:GO Server
Depending on the game mode, you can showtime your server in many ways. Commencement, go to the cs_go directory in social club to utilise thesrcds_run awarding.
Important: Do not forget to replace your GSLT afterwards +sv_setsteamaccount, when you are starting your server.
Classic Casual:
./srcds_run -game csgo -panel -usercon +game_type 0 +game_mode 0 +mapgroup mg_active +map de_dust2 +sv_setsteamaccount THISGSLTHERE -net_port_try
Archetype Competitive:
./srcds_run -game csgo -console -usercon +game_type 0 +game_mode 1 +mapgroup mg_active +map de_dust2 +sv_setsteamaccount THISGSLTHERE -net_port_try
Deathmatch:
./srcds_run -game csgo -console -usercon +game_type 1 +game_mode 2 +mapgroup mg_allclassic +map de_dust +sv_setsteamaccount THISGSLTHERE -net_port_try
Determination
You have learned how to make a CS:GO server on Linux VPS. You can read more useful tips on Valve'due south official page for dedicated servers.

Edgaras is a veteran server administrator at Hostinger. He makes sure that every server runs at full throttle and has all the latest technological advancements. When he'south non working, Edgaras enjoys skiing and exploring the world.

Cs Go Offline Server 128 Tick,
Source: https://www.hostinger.com/tutorials/how-to-make-a-csgo-server
Posted by: holbrookdeclact.blogspot.com
0 Response to "Cs Go Offline Server 128 Tick"
Post a Comment